이번엔 Firebase로 연동하여 App으로 Push Message 보내는 방법을 써보려한다.
필자가 서비스하는 App을 기준으로 설명해 보겠다.
우선 원리부터 설명하자면 크게 기기 등록과 Push 전송으로 나눌 수 있다.
STEP 1 - 기기 등록
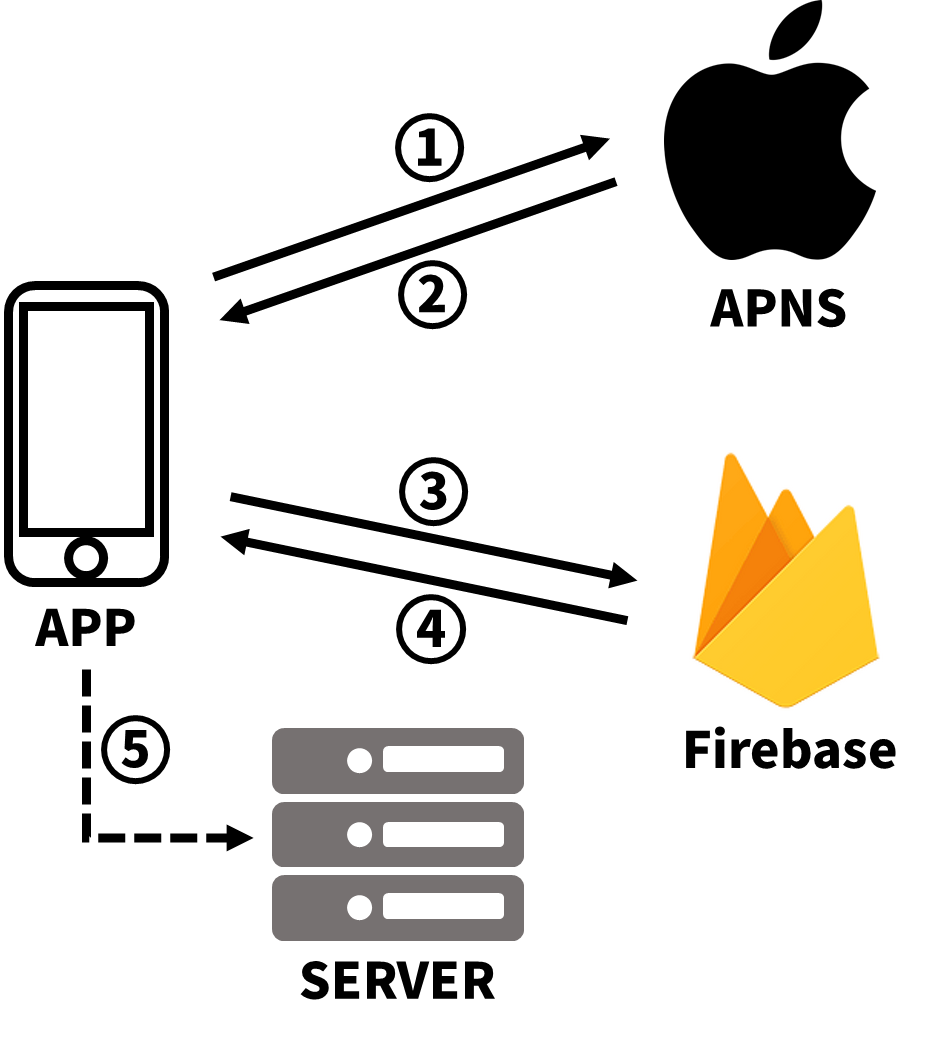
- APNS 서버에 기기등록을 요청한다.
- 등록된 Device Token을 App으로 전달해준다.
- APNS로부터 받은 Device Token을 Firebase로 전달해준다.
- FCM Token을 App으로 전달해준다.
- FCM Token을 Server로 전달해준다.(여기서 Server는 Push Message를 발생시키는 서버로 생략가능)
STEP 2 - Push 전송
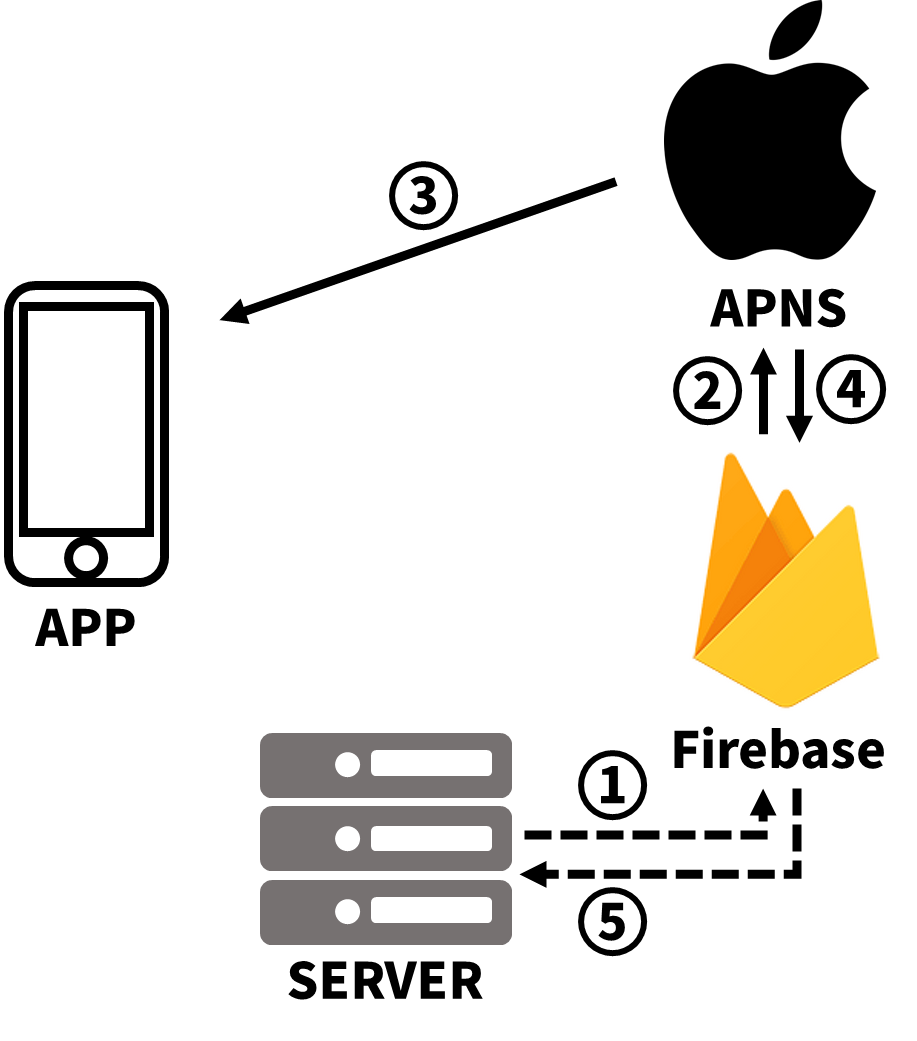
- Firebase로 Push Message 전송 요청(꼭 Server가 아니여도 Firebase로 Push Message 전송 요청만 해주면됨)
- APNS로 App에 Push Message 전송 요청 with Device token & Certificate and App Information
- App으로 Push Message 전송
- Push Message 전송 결과 Firebase로 전송
- Push Message 전송 결과 Server로 전송
iOS Push Message는 APNS(Apple Push Notification Service)를 꼭 거쳐야한다.
아마 메시지를 받으면 Queue처럼 차례대로 전송이 되지 않을까 싶다.
(카더라긴한데 우리나라의 경우 네트워크 상태가 굉장히 양호해서 Push Message를 전송하면바로 받을 수 있지만
네트워크 상태가 안 좋은 나라는 APNS에 쌓이고 나가는데 지연이 되서 상당히 늦게 받는다고 한다.)
이제 소스를 간단히 리뷰해보자.
아래 모든 소스는 AppDelegate.swift 파일에 정의했다.
import Firebase기본적으로 Firebase를 포함시킨다.
func application(_ application: UIApplication, didFinishLaunchingWithOptions launchOptions: [UIApplication.LaunchOptionsKey: Any]?) -> Bool {

    //1.Firebase 초기세팅
    FirebaseApp.configure()
    //2.Firebase Message Delegate 위임
    Messaging.messaging().delegate = self
    //3.NotificationCenter Delegate 위임
    UNUserNotificationCenter.current().delegate = self

    //4.App 권한 요청
    let authOptions: UNAuthorizationOptions = [.alert, .badge, .sound]
    UNUserNotificationCenter.current().requestAuthorization(options: authOptions) { granted, error in
        if let err = error {
            NSLog("UNUserNotificationCenter.requestAuthorization error : \(err)")
        }
        if granted {
            NSLog("Notification Authorization is Granted.")
        }else{
            NSLog("Notification Authorization is Denied.")
        }
    }

    //5.APNS에 기기등록 요청
    application.registerForRemoteNotifications()
}
1~3번은 Comment로 설명이 될것 같고
4번의 경우 , 위에 모식도에는 설명을 안했는데 Notification Center에 권한을 요청하는 소스이다.
위의 경우 alert/badge/sound 권한에 대해 요청하고 있다.
5번은 APNS에 기기등록을 요청하는 메소드이다.
위 메소드의 Callback으로 (뒤에 이어서 설명할 예정이다.)
성공 시, func(application: didRegisterForRemoteNotificationsWithDeviceToken:)
실패 시, func(application: didFailToRegisterForRemoteNotificationsWithError:)
를 호출한다.
extension AppDelegate: UNUserNotificationCenterDelegate {
    //1.APNS에 기기등록에 성공했을 때 호출되는 메소드 Firebase의 apnsToken으로 Device Token 전달
    func application(_ application: UIApplication, didRegisterForRemoteNotificationsWithDeviceToken deviceToken: Data) {
        Messaging.messaging().apnsToken = deviceToken
    }

    //2.Foreground/Background 상관없이 Notification을 캐치하는 메소드
    func application(_ application: UIApplication, didReceiveRemoteNotification userInfo: [AnyHashable : Any], fetchCompletionHandler completionHandler: @escaping (UIBackgroundFetchResult) -> Void) {
        AppLogUtil.nsLog("didReceiveRemoteNotification userInfo : \(userInfo)")
    }

    //3.Foreground 상태일 때 어떻게 Push Message를 처리할지 정의하는 메소드
    func userNotificationCenter(_ center: UNUserNotificationCenter,
                                willPresent notification: UNNotification,
                                withCompletionHandler completionHandler: @escaping (UNNotificationPresentationOptions)
        -> Void) {
        let userInfo = notification.request.content.userInfo
        let title = notification.request.content.title
        let body = notification.request.content.body

        completionHandler([[.alert, .sound]])

    }

    //4.Notification Center에 Push 수신 결과 반환하는 메소드
    func userNotificationCenter(_ center: UNUserNotificationCenter,
                                didReceive response: UNNotificationResponse,
                                withCompletionHandler completionHandler: @escaping () -> Void) {
		let userInfo = response.notification.request.content.userInfo

        completionHandler()
    }

}
위는 UNUserNotificationCenterDelegate 구현 부분이다.
Comment로 어느정도 설명이 될 것 같고,
2번의 경우 iOS10이하일 경우 App이 Foreground 상태일 때,
Push Message를 처리하려면 커스터마이징한 alert을 띄웠어야 한다고 한다.
필자는 iOS10이상을 개발하기 때문에 2번 메소드를 정의하여 Push Message를 Foreground 상태에서 처리했다.
extension AppDelegate: MessagingDelegate {
	//FCM토큰이 업데이트되거나 만료됐을때마다 호출 통상 한번 호출된다.
	func messaging(_ messaging: Messaging, didReceiveRegistrationToken fcmToken: String?) {
		//fcmToken을 서버로 전달해준다.
		NSLog("FCM Token: \(fcmToken)")
	}
}
위는 MessageDelegate 구현 부분이다.
이 부분도 Comment로 설명이 될 것 같다.
필자는 다른 소스에서 위 메소드로 받은 FCMToken을 Server로 전달해줬다.
후... 이번편은 유난히 심혈을 기울인 것 같다.
얼른 발 닦고 잠이나자러 가야지~

추가로
로그아웃할 때 fcmToken 정보를 날리지 않으니 로그아웃을 해도 Push Message가 날라왔다;;;
아래와 같이 간단하게 fcmToken 정보를 지워주면 되겠다.
func logout(){
	//FCM에 등록된 토큰 제거
	Messaging.messaging().deleteToken {error in
		if let error = error {
			AppLogUtil.nsLog("Error fetching FCM registration token: \(error)")
		}
	}
}'iOS 한번 개발해보자 > related to UIKit' 카테고리의 다른 글
| [iOS][UIKit]Watermark 적용하기 (0) | 2022.07.25 |
|---|---|
| [iOS][UIKit]LaunchScreen만 Portrait으로 고정하기 (0) | 2022.06.29 |
| [iOS][UIKit]Network 상태 확인하기 (0) | 2022.06.28 |
| [iOS][UIKit]Background에서도 죽지 않게 실행시키기 (0) | 2022.06.28 |


댓글